- 本节目标
- 前置条件
- 实操方案一:使用 Foundry 部署 HelloWorld 合约
- 实操方案二:使用 Hardhat 部署 HelloWorld 合约
- (可选)方案三:使用 Remix 部署
- “纸上谈兵”提示
- 小结
- 推荐练习
本节目标
- 创建一个最小的 Solidity 合约
- 使用 Foundry 或 Hardhat 在本地部署它
- 调用链上函数,确认部署成功
前置条件
- 推荐已经完成 第 0 课,搭建好开发环境
- 已安装:
- Node.js(用于 Hardhat)
- 或 Foundry(用于
forge) - 或使用 Remix(可选 Web 环境)
实操方案一:使用 Foundry 部署 HelloWorld 合约
1. 创建项目
$ forge init hello-world
$ cd hello-world && tree -L 1
.
├── foundry.toml    # 项目的配置入口
├── lib/            # 依赖库目录,用于存放外部依赖(比如 openzeppelin-contracts)
├── README.md       # 项目说明文档
├── script/         # 脚本目录,部署或脚本自动化代码的位置
├── src/            # 主合约目录,所有生产环境要部署的合约都应该放在这里
└── test/           # 测试目录,所有测试合约放在这里
使用forge init 创建的项目中在 src、script和test目录下有项目的示例文件,在我们的 HelloWorld 合约中并不需要,所有需要将这些文件删除。
2. 编写合约
编辑 src/HelloWorld.sol:
// SPDX-License-Identifier: MIT
pragma solidity ^0.8.0;

contract HelloWorld {
    string public greet = "Hello, World!";
}
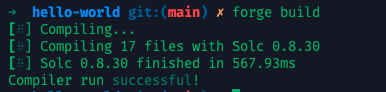
3. 编译合约
$ forge build
你将看到:
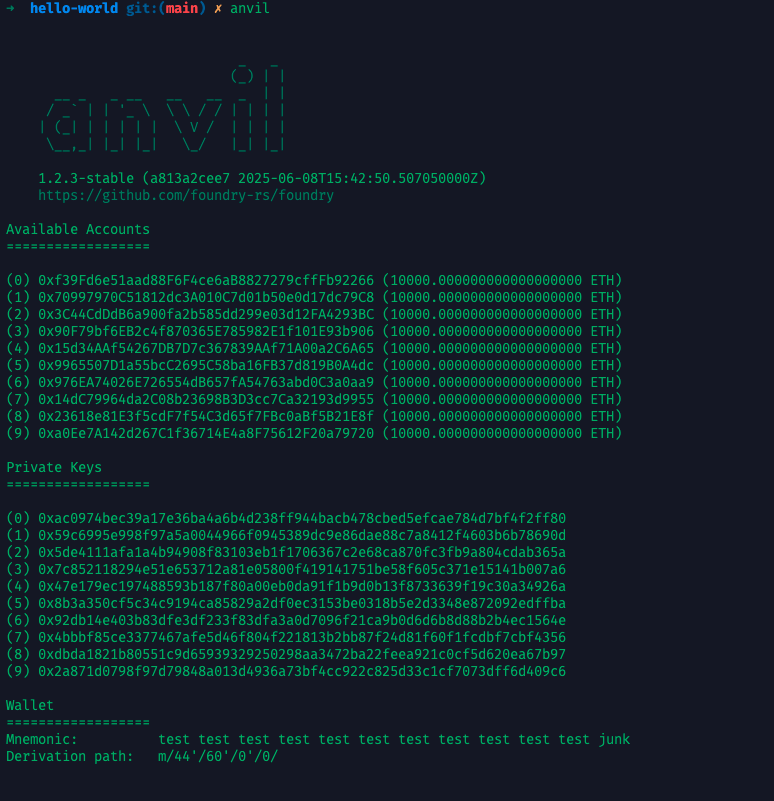
4. 启动本地节点 + 部署(使用 Anvil)
我们可以使用 anvil 在本地启动一条测试链来部署我们的合约,通过 http://127.0.0.1:8545就可以访问测试链:
$ anvil
打开另一个终端,创建脚本 script/HelloWorld.s.sol:
// SPDX-License-Identifier: MIT
pragma solidity ^0.8.0;

import "forge-std/Script.sol";
import "../src/HelloWorld.sol";

contract Deploy is Script {
    function run() external {
        vm.startBroadcast();
        new HelloWorld();
        vm.stopBroadcast();
    }
}
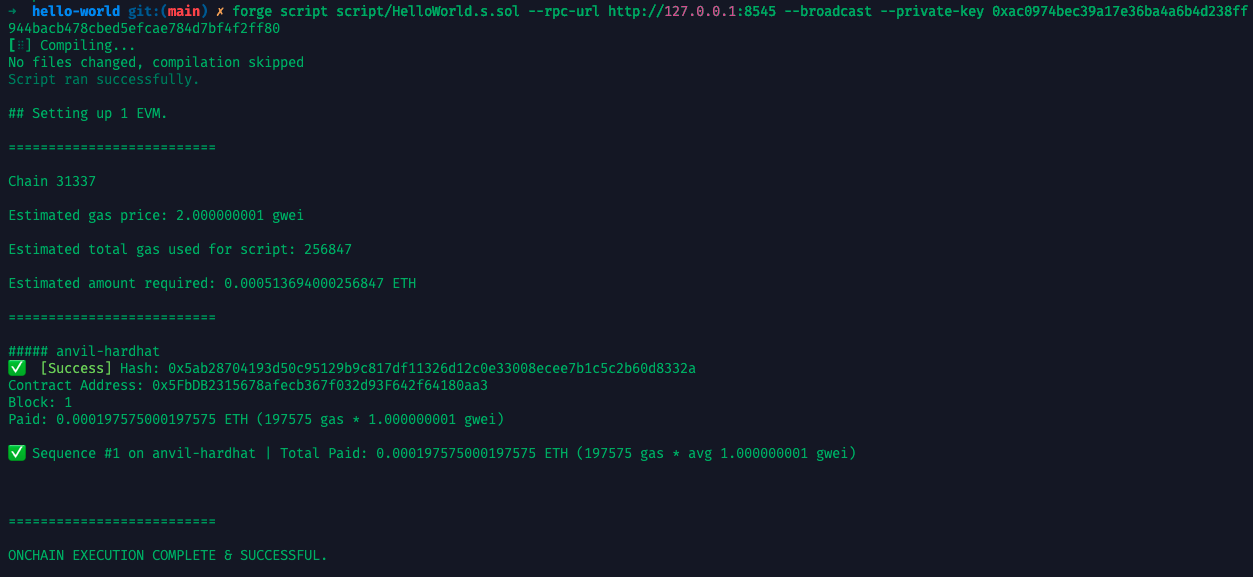
部署脚本运行:
$ forge script script/HelloWorld.s.sol --rpc-url http://127.0.0.1:8545 --broadcast --private-key 0xac0974bec39a17e36ba4a6b4d238ff944bacb478cbed5efcae784d7bf4f2ff80
输出会显示部署地址:
实操方案二:使用 Hardhat 部署 HelloWorld 合约
Hardhat 我不怎么使用,所以下面的代码中可能误
1. 初始化项目
$ mkdir hello-hardhat
$ cd hello-hardhat
$ npm init -y
$ npm install hardhat
$ npx hardhat
选择 Create a basic sample project:

2. 编辑合约 contracts/HelloWorld.sol
// SPDX-License-Identifier: MIT
pragma solidity ^0.8.0;

contract HelloWorld {
    string public greet = "Hello, Hardhat!";
}
3. 编译合约
$ npx hardhat compile

4. 启动本地链
$ npx hardhat node
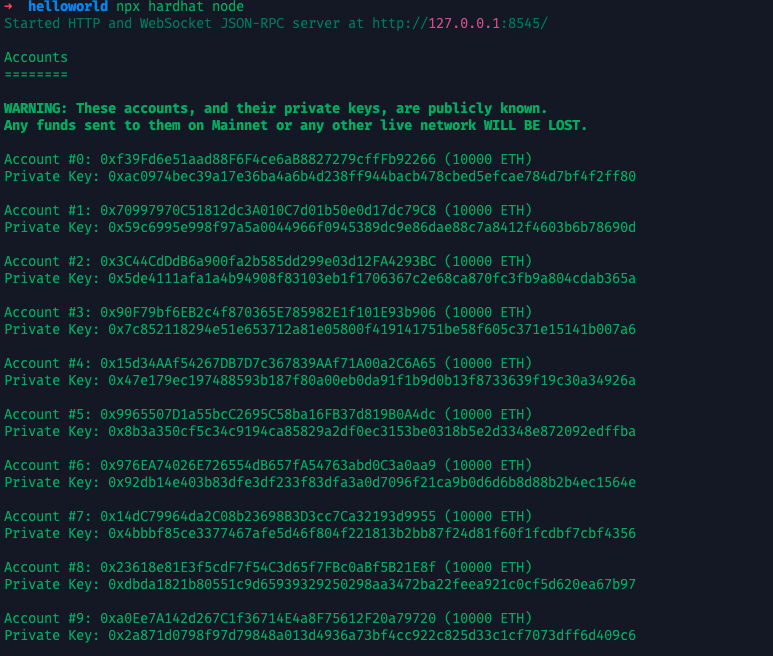
Hardhat 会输出多个预置账户(含私钥),用于测试。
5. 创建部署脚本
编辑 scripts/deploy.js:
const { ethers } = require("hardhat");

async function main() {
  const Hello = await ethers.getContractFactory("HelloWorld");
  const hello = await Hello.deploy(); // Already deployed here
  await hello.deployed(); // optional, but often included to wait for deployment

  console.log("Contract deployed to:", hello.address);
}

main().catch((error) => {
  console.error(error);
  process.exitCode = 1;
});
运行部署脚本:
$ npx hardhat run scripts/deploy.js --network localhost
6. 调用合约函数(可选)
创建 Hardhat 控制台:
$ npx hardhat console --network localhost
在控制台中输入:
const HelloWorld = await ethers.getContractFactory("HelloWorld");
const hello = await HelloWorld.attach("部署时输出的地址");
await hello.greet();  // 应输出 "Hello, Hardhat!"
(可选)方案三:使用 Remix 部署
- 粘贴合约代码
- 编译后,点击“部署”
- 点击合约展开,可以看到
greet值
“纸上谈兵”提示
| 问题 | 原因 |
|---|---|
| 为何构造函数没用? | 我们没定义 constructor(),所以默认不执行初始化逻辑 |
| public 变量为何自动生成 getter? | Solidity 会自动为 public 状态变量生成只读函数 |
| 合约地址是怎么算出来的? | 它基于部署者地址 + nonce 生成。下一课我们会讲原理 |
小结
你已经部署了人生第一个 Solidity 合约 🎉!
| 技术 | 工具 | 关键词 |
|---|---|---|
| 合约语言 | Solidity | 状态变量、合约部署 |
| 工具链 | Foundry / Hardhat | 脚本部署、编译、运行本地链 |
| 平台 | Remix | 快速验证合约逻辑 |
推荐练习
- 修改
greet字符串,重新部署。 - 添加一个
function setGreet(string memory newGreet)可供外部调用。 - 改写为部署时通过构造函数初始化
greet。
下一课我们将讲:
第 2 课:《调用、修改、读取:Solidity 合约不是 REST API》

声明:本作品采用署名-非商业性使用-相同方式共享 4.0 国际 (CC BY-NC-SA 4.0)进行许可,使用时请注明出处。
Author: mengbin
blog: mengbin
Github: mengbin92
腾讯云开发者社区:孟斯特
—